Screen Recording: How to Record Your Screen on Any Device

You’ve probably already used a screenshot to explain something, but screen recording is often much better when the process involves movement, audio, or multiple steps. In this guide, you’ll learn how screen recording works, how to record your screen on major devices, which tools to use, how to capture audio and webcam footage, and how to protect sensitive information before sharing.
Key Takeaways
- Screen recording captures activity on a computer, phone, or tablet display as video and can include microphone audio, system audio, webcam footage, or a combination.
- Built-in screen recorders are available on major platforms, including Windows, macOS, Chromebook, iPhone, iPad, and many Android devices.
- Browser-based and dedicated recorders add features such as editing, annotations, webcam overlays, instant sharing, and higher-quality recording.
- Recording quality depends on the capture area, resolution, frame rate, audio source, cursor settings, and intended use.
- Screen privacy requires checking passwords, API keys, emails, customer information, notifications, and private dashboards before recording.
- Screen recording is useful for tutorials, training, product demos, troubleshooting, presentations, online classes, customer support, and asynchronous communication.
- The best screen recording method depends on your device, use case, audio and webcam requirements, editing needs, sharing workflow, and privacy requirements.
What Is Screen Recording and How Does It Work?
Screen recording is the process of capturing the visual activity on a computer, phone, or tablet display as a video, optionally including microphone audio, system audio, or webcam footage. Unlike a screenshot, which captures one still image, a screen recording shows what happens over time.
For example, a screenshot can show where to click a button, while a 30-second screen recording can show the entire process from opening an application to completing the task.
Moreover, screen recording can capture an entire display, specific window, browser tab, or selected area, depending on the operating system or recording software.
What Is the Difference Between Screen Recording and a Screenshot?
A screenshot is a static image, while a screen recording is a video of activity on your display. A screenshot works well for showing a single result, while a recording works better for demonstrating a process.
For example, a software support agent can send one screenshot showing an error message, but a screen recording can demonstrate exactly how the error occurs.
In addition, a screencast generally refers to a presentation or demonstration delivered through recorded screen content, often with narration. A webcam recording focuses primarily on the camera view rather than the computer display.
Why Is Screen Recording Useful?
Screen recording is useful because it communicates visual processes more clearly than text alone. A recording can show exactly what to click, where to navigate, and what result to expect.
For example, a teacher can record a software demonstration, while a developer can record a reproducible bug instead of writing a long explanation.
Moreover, common screen-recording use cases include:
- Tutorials: Demonstrate software, websites, or workflows.
- Product demos: Show how a feature works.
- Customer support: Explain solutions visually.
- Training: Create reusable employee instructions.
- Education: Record lessons and software demonstrations.
- Presentations: Explain dashboards, documents, or designs.
- Troubleshooting: Capture bugs and unexpected behavior.
- Async communication: Replace repetitive meetings with short videos.
Loom says its screen recorder is used for tutorials, presentations, feedback, collaboration, and sharing, while TechSmith positions screen recording around training, documentation, demonstrations, and communication.
Screen recording turns a visual workflow into a reusable communication asset.
What Are the Main Types of Screen Recording?
Screen recording methods generally fall into built-in device tools, browser-based or extension-based recorders, and dedicated desktop or mobile recording software.
For example, Windows includes Snipping Tool and Xbox Game Bar, Chromebook has a built-in Screen Capture workflow, and iPhone includes screen recording through Control Center.
Built-In Screen Recording
Built-in screen recorders are the easiest choice when you need a quick capture without installing another application. They are particularly useful for short tutorials, bug reports, and simple demonstrations.
For example, Windows 11 includes screen recording through Snipping Tool, while Xbox Game Bar can record application or game clips.
Browser-Based Screen Recording
Browser-based screen recording lets you capture a browser tab, window, or screen through a web application. This approach works well for tutorials, product demonstrations, and quick collaborative videos.
For example, Microsoft Clipchamp can record a browser tab, window, or entire screen, while Loom can record screen, camera, or both and generate a shareable video link.
Dedicated Screen Recording Software
Dedicated software provides more control over recording sources, editing, scenes, audio, and production quality. This approach is useful for creators, trainers, streamers, and teams producing polished video content.
For example, OBS Studio supports multiple sources such as windows, browser windows, webcams, images, and capture cards, while Camtasia supports screen, camera, microphone, and system-audio recording.
How Do You Screen Record on Windows?
Windows provides several built-in screen recording options, including Snipping Tool, Xbox Game Bar, and Clipchamp. The best option depends on whether you need a quick capture, application recording, or recording plus editing.
How Do You Screen Record With Snipping Tool?
Snipping Tool provides built-in screen recording on supported Windows 11 systems and lets you select the area you want to capture before recording.
To use it:
- Open Snipping Tool from the Start menu or taskbar search.
- Select the Record option.
- Choose the portion of the screen you want to capture.
- Start recording.
- Stop the recording when you finish.
- Preview and save the result.
How Do You Screen Record With Xbox Game Bar?
Xbox Game Bar is useful for recording an application or game on Windows 10 and Windows 11. Press Windows + Alt + R to start or stop recording, and Windows + Alt + M to toggle the microphone. Recordings are saved as MP4 files in Videos > Captures.
For example, developers can use Game Bar to capture a reproducible software issue and send the resulting video to a teammate.
How Do You Screen Record on a Mac?
Mac users can record their screen using the built-in Screenshot toolbar or QuickTime Player. Apple states that the Screenshot app can record the entire screen or a selected portion on macOS Mojave 10.14 and later.
How Do You Screen Record With the Mac Screenshot Tool?
First, press Shift + Command + 5 to open the Screenshot toolbar. Then choose whether to record the entire screen or a selected portion and adjust the available options before starting.
For example, you can select only a browser window area instead of recording your entire desktop.
Moreover, recording only the required area can reduce distractions and prevent unrelated private information from appearing in the video.
How Do You Screen Record on a Chromebook?
Chromebook includes a built-in screen recording tool that can capture the full screen, partial screen, or a specific window. It can also record device audio, microphone audio, or both, and supports optional camera capture.
How Do You Start a Chromebook Screen Recording?
Press Shift + Ctrl + Show windows, then select Screen record. Choose full-screen, partial-screen, or window recording, configure audio or camera settings, and start recording. Chromebook recordings are saved to the Downloads folder by default.
For example, a student can record only a browser window while explaining an online lesson.
How Do You Screen Record on an iPhone or iPad?
iPhone and iPad provide built-in screen recording through Control Center. Apple says users can start recording with a three-second countdown and find completed recordings in the Photos app.
How to Record Your iPhone or iPad Screen
- Swipe down from the top-right corner to open Control Center.
- Tap the Screen Recording button.
- Wait for the three-second countdown.
- Leave Control Center and perform the actions you want to capture.
- Tap the recording indicator and choose Stop, or reopen Control Center and stop recording.
- Open Photos to find the recording.
For example, you can record a mobile-app bug and send the video to a developer instead of describing every step.
Apple also notes that some apps may prevent audio or video recording and that screen recording cannot be used simultaneously with screen mirroring.
How Do You Screen Record on Android?
Android devices that support the built-in Screen recorder generally let you capture the phone display and optionally record audio or show screen touches. Google documents the workflow through Quick Settings.
How to Record Your Android Screen
- Swipe down twice from the top of the screen.
- Tap Screen recorder.
- If the option is missing, edit Quick Settings and add it when supported.
- Choose your audio and touch-display options.
- Tap Start.
- Stop recording from the screen recorder notification.
- Open Photos and find the recording under your device's movies or recordings.
For example, you can record a mobile checkout problem while showing the exact buttons you pressed.
How Do You Screen Record With Audio and Webcam?
Screen recording with audio captures your display while adding microphone audio, device audio, or both. Screen recording with a webcam adds your camera feed so viewers can see the presenter while watching the screen.
How Do You Record Your Screen With Audio?
First, decide whether you need microphone audio, system audio, or both. Microphone audio records your narration, while system or device audio captures sounds generated by the computer or phone.
For example, a software tutorial usually needs microphone narration, while a gameplay recording may need game audio and microphone commentary.
Chromebook supports device audio, microphone, or both, while Clipchamp can capture microphone audio and, in supported browser workflows, system audio from a browser tab.
How Do You Screen Record With Your Webcam?
A webcam overlay adds your face to the screen recording and can make presentations, tutorials, and sales demonstrations more personal. Loom supports screen-only and screen-plus-camera recording, while Camtasia and Snagit provide webcam recording and picture-in-picture options.
For example, a product founder can show a new feature while appearing in a small camera window.
Use your webcam when personality matters; skip it when the screen itself is the message.
What Settings Should You Use for High-Quality Screen Recordings?
High-quality screen recording depends on resolution, frame rate, capture area, audio quality, and the final destination of the video.
For example, 1080p is usually sufficient for tutorials and business demonstrations, while 4K can make sense when recording detailed interfaces or producing high-quality content for large displays.
A practical starting point is:
| Setting | Recommended starting point | Best for |
|---|---|---|
| Resolution | 1080p | Tutorials, demos, training |
| Resolution | 4K | Detailed professional content |
| Frame rate | 30 FPS | Tutorials and presentations |
| Frame rate | 60 FPS | Gameplay and fast movement |
| Capture area | Specific window/tab | Focused tutorials |
| Audio | Microphone + system audio | Narrated demonstrations |
| Webcam | Optional | Presentations and personal videos |
Camtasia supports screen recording up to 4K at 60 frames per second, while Loom offers recording options including 1080p and 4K depending on its plan and workflow.
Moreover, audio quality often matters more than video resolution for instructional recordings. A clear microphone in a quiet room can make a 1080p tutorial feel more professional than a 4K recording with distracting background noise.
What Is the Best Free Screen Recorder?
The best free screen recorder depends on your device and what you need to do after pressing Record. Built-in tools are usually best for quick captures, while browser-based and dedicated tools are better when sharing or editing matters.
Best Screen Recording Tools by Use Case
| Tool | Platform | Audio | Webcam | Editing | Best use case |
|---|---|---|---|---|---|
| Snipping Tool | Windows | Basic | Limited | Basic | Quick Windows captures |
| Xbox Game Bar | Windows | Yes | Limited | Minimal | Apps and gameplay |
| macOS Screenshot | Mac | Options vary | No built-in overlay | Minimal | Quick Mac recordings |
| Chromebook Screen Capture | Chromebook | Device + mic | Yes | Basic | Simple Chromebook recording |
| Loom | Windows, Mac, Chrome, iOS, Android | Yes | Yes | Yes | Tutorials and sharing |
| Clipchamp | Windows/Web | Yes | Yes | Yes | Recording plus editing |
| Camtasia | Windows/Mac | Yes | Yes | Advanced | Professional tutorials |
| OBS Studio | Windows/Mac/Linux | Advanced | Yes | Production-focused | Streaming and advanced recording |
Loom currently supports screen and audio recording across Mac, Windows, Chrome, iOS, and Android, along with editing, annotations, captions, and instant sharing.
TechSmith's Camtasia focuses on recording and editing, including separate screen, camera, microphone, and system-audio tracks.
OBS Studio is a free, open-source option designed for video recording and live streaming, with multiple sources and an advanced audio mixer.
The best screen recorder is the one that matches your workflow, not simply the one with the most features.
How Do You Protect Sensitive Information in a Screen Recording?
Screen recording privacy involves preventing passwords, API keys, personal information, customer data, notifications, and other sensitive content from appearing in the captured video.
For example, a developer recording an API tutorial could accidentally expose a live API key in a browser tab or terminal window.
What Should You Check Before Recording?
Before pressing Record, check:
Moreover, close unnecessary tabs and applications before recording. Use test data instead of production data whenever possible.
For more detailed guidance, see our guide on blur screen for privacy.
How Can You Blur Sensitive Information in a Screen Recording?
You can manually hide sensitive content before recording, edit it afterward, or use a privacy tool designed to identify sensitive information during screen activity.
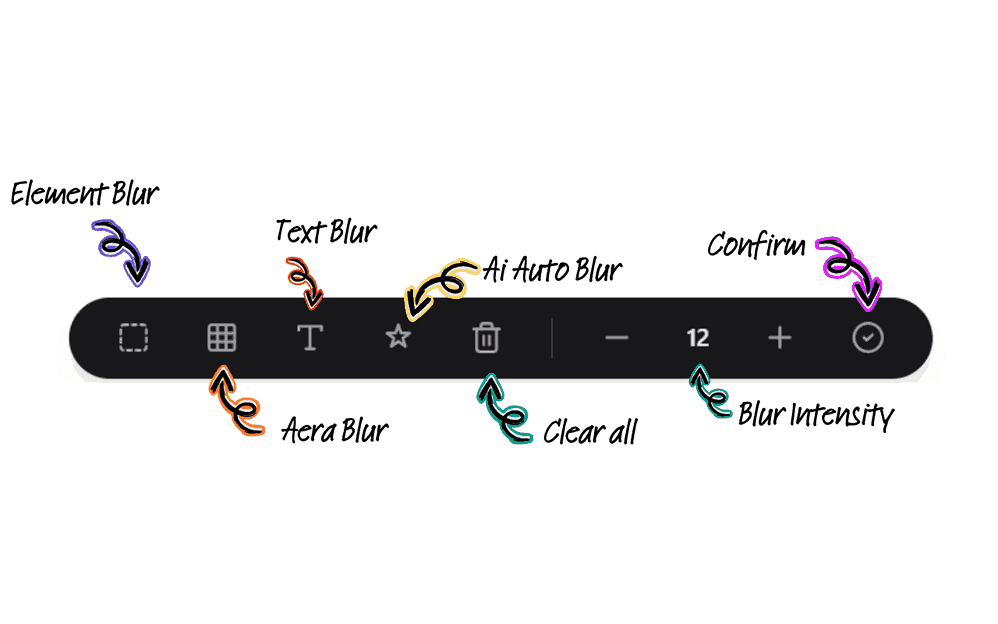
AIBlurWeb is designed to automatically detect and hide sensitive information such as emails, phone numbers, and API keys during screen sharing and recordings, with processing performed locally in the browser according to its product positioning.
For example, you can use AI-powered screen privacy to reduce the chance of exposing sensitive browser information while demonstrating a real workflow.
You can also use try AI BlurWeb to test browser-based blurring before recording a real workflow.
A screen recording is not private simply because the recording itself is stored securely; private information must also be prevented from entering the video.
What Should You Do After Recording Your Screen?
Post-recording cleanup is the process of reviewing, editing, protecting, exporting, and sharing a screen recording after capture.
For example, a five-minute tutorial may become much more useful after removing a 20-second mistake, trimming silence, and adding a caption to an important step.
Use This Post-Recording Checklist
- Watch the entire recording.
- Remove mistakes, pauses, and irrelevant sections.
- Check every frame for sensitive information.
- Blur or redact exposed private data.
- Add captions when narration matters.
- Highlight important clicks or cursor movements.
- Give the file a descriptive name.
- Export using an appropriate quality setting.
- Store the recording in a secure location.
- Share it only with the intended audience.
For image-based privacy work, you can also reference our guide on how to blur images before sharing.
If a screenshot needs separate treatment, check back soon for our guide on how to blur a screenshot.
How Do You Choose the Right Screen Recording Workflow?
The right screen recording workflow depends on your device, purpose, editing requirements, sharing needs, and privacy risk.
For example, someone reporting a software bug may only need a built-in recorder, while a creator producing a professional course may need advanced editing and multiple audio tracks.
Use this simple decision framework:
- Quick capture: Use your device's built-in recorder.
- Tutorial and instant sharing: Use a browser-based recorder such as Loom.
- Microsoft workflow: Use Clipchamp when recording and editing are both required.
- Advanced production: Use OBS Studio or Camtasia.
- Mobile demonstration: Use the native iPhone or Android screen recorder.
- Sensitive browser data: Add a privacy workflow using automatic sensitive-data blurring before recording.
- Editing-heavy project: Choose software with trimming, annotations, multiple tracks, and export controls.
What’s Next: How Should You Start Screen Recording?
The simplest way to start screen recording is to choose the smallest capture setup that solves your communication problem.
First, decide what you want the viewer to understand. Then select the specific window, browser tab, application, or display area required for that explanation.
Second, test your microphone and audio before recording the full video. A 10-second test can prevent an entire tutorial from being unusable because the microphone was muted.
Third, review privacy before publishing. If your video contains passwords, API keys, customer information, or private dashboards, use a redaction or blurring workflow before sharing.
For more information about screen sharing privacy, review your privacy checklist before every important recording.
Conclusion
Screen recording is the process of turning activity on your screen into a video that can explain, demonstrate, teach, or document a workflow. The best method depends on your device and goal, whether you need a quick capture, narrated tutorial, webcam presentation, advanced production, or instant sharing.
Moreover, good screen recording is about more than pressing Record. Choose the right capture area, test your audio, use sensible quality settings, remove unnecessary content, and check every frame for sensitive information.
Finally, treat privacy as part of the recording workflow rather than an afterthought. If you regularly demonstrate real browser data, dashboards, customer information, or development environments, consider protecting sensitive data while recording as part of your preparation.
The best screen recording is clear, focused, easy to understand, and safe to share.

Written & Reviewed by Deepak (Founder)
Founder & Solo Developer at AIBlurWeb
Deepak builds privacy-focused browser tools and writes about screen privacy, browser security, sensitive-data protection, screen sharing, and AI-powered privacy tools. Read more about the founder →
Disclaimer: This article was initially drafted using AI assistance. However, the content has undergone thorough revisions, editing, and fact-checking by human editors and subject matter experts to ensure accuracy.