The Ultimate Guide to the Blur Tool: How to Enhance Images & Protect Privacy

You've probably seen photos with blurry backgrounds or used a simple blur effect in a photo app. However, you might be missing how powerful blur tools can truly be. In this guide, you’ll learn exactly what blur tools are, why they’re so useful, and how to use them step-by-step to hide private details and make your images look more professional.
Key Takeaways
- Blur tools definition: Photo-editing features that soften or obscure selected parts of an image by blending nearby pixels.
- Adjustable settings: Brush size, softness, and strength allow precise control over which areas to blur and the intensity of the effect.
- Privacy and focus: Blurring background areas isolates the main subject, while blurring faces, emails, or text protects privacy.
- Diverse blur styles: Gaussian, motion, radial, lens bokeh, and pixelation create distinct looks from subtle soft focus to heavy censorship.
- Cross-platform tools: Desktop suites (Photoshop, GIMP), online editors (Pixlr, Canva), and mobile apps (Snapseed, PicsArt) provide intuitive blur options.
- Creative depth: Blur adds visual depth and mood, converting ordinary snapshots into engaging, high-focus compositions.
- Best practice: Always edit non-destructively on separate layers and blur only non-essential elements to guide viewer focus.
What Is a Blur Tool and How Does It Work?
A blur tool is a photo-editing feature that obscures parts of an image by softening and blending nearby pixels. It works by smearing neighboring pixels together so that details like text, faces, or other information become unreadable. Typically, blur tools use a Gaussian blur algorithm that averages the color values of adjacent pixels, producing a smooth, out-of-focus effect. For example, applying Gaussian blur to a photo’s background will remove sharp edges and fine details, making the background look soft and dreamy.
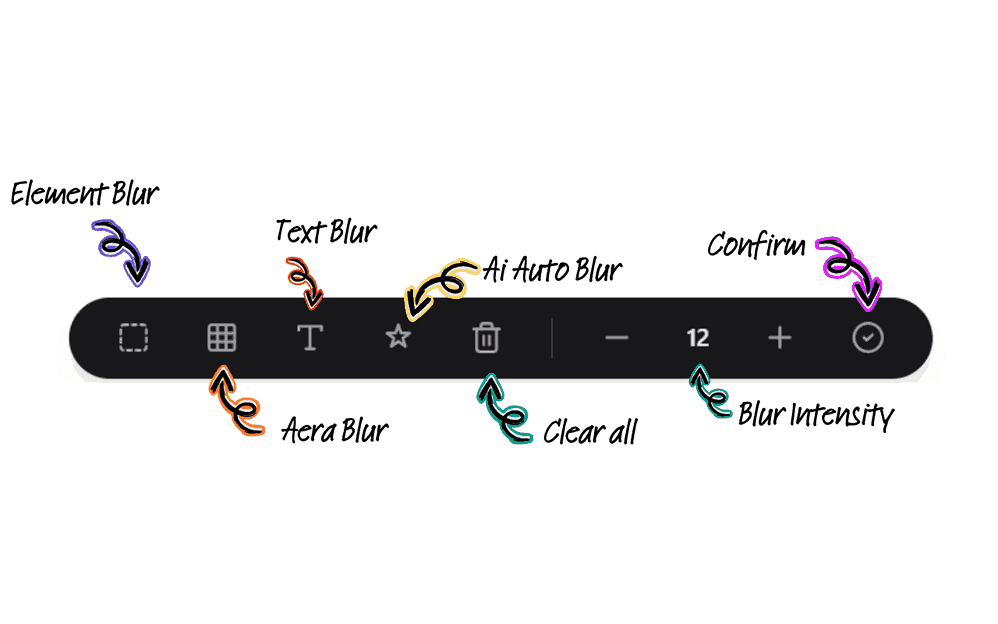
First, many editors provide a brush-based Blur tool. You select the Blur tool and brush over the areas you want to soften. For instance, in Photoshop you choose the Blur tool from the toolbar, pick a brush tip and strength, then drag over the spots to blur. This lets you manually “paint” the blur onto your image. By using layers, you can apply blur non-destructively and adjust it later if needed.
For example, imagine you upload a screenshot of a document into an online editor. You could simply brush over the sensitive text to hide it. Pixlr Express, for instance, has a Blur tool in its Retouch menu. You adjust the Brush Size and Strength, then drag on the image to blur selected parts. The result is that only those parts are softened, leaving the rest of the image sharp.
At the same time, blur features are ubiquitous in software today. Photo editing programs (Photoshop, GIMP) include multiple blur filters, and even screenshot apps (like Snagit) offer quick blur or pixelate buttons. If you share images or videos containing sensitive data, you’ve probably used blur as part of your workflow. In short, blur tools work behind the scenes with pixel averaging to hide details, and they are built into almost every imaging app you use.
Why Should You Use a Blur Tool in Photo Editing?
A blur tool matters because it lets you emphasize important parts of an image while hiding the rest. Blurring the background can isolate the main subject and give the photo a professional, high-focus look. For example, portrait photographers often blur backgrounds to mimic a shallow depth-of-field. The subject remains in sharp focus while the surroundings fade smoothly, drawing the viewer’s attention. A blurred background also adds depth and mood (a creamy, dreamlike effect) to an otherwise ordinary photo.
Meanwhile, blurring is critical for protecting privacy. If you’re sharing screenshots, documents, or personal photos, blur can hide sensitive information. For instance, blur out faces, email addresses, or license plates to prevent identity leaks. Tools like Snagit provide one-click blur/pixelate options so you can quickly cover up text or graphics. By concealing these details, you can share your content with confidence knowing private data is protected.
At the same time, blur can guide viewer focus. By blurring everything except your subject, you tell the eye where to look. For instance, in a photo of a conference room, you could blur the names on name tags and background clutter, ensuring attention stays on the speaker. In other words, blur acts like a visual cue: unimportant elements fade into the background, and important ones stand out. It’s a technique often taught in graphic design fundamentals to improve composition and storytelling.
Taken together, the blur tool serves both practical and creative purposes. You use it to protect identity and sensitive details, and you also use it to craft more engaging images. Whether isolating a product shot by blurring surroundings or redacting a screenshot before publishing, blur is an essential tool in a modern editor’s kit.
Need real-time screen & browser data blurring?
Explore AI BlurWeb — automatically blur sensitive credentials, emails, and inputs on live screen shares.
How Do You Apply a Blur Tool to an Image (Step-by-Step)?
Using a blur tool follows a simple workflow: open your image, select the blur feature, and paint or apply it to the areas you want to soften.
Open Your Image in an Editor
First, launch a photo editing program or app and load the image you want to edit. This could be desktop software like Photoshop or GIMP, an online editor like Pixlr, or a mobile app like Snapseed or PicsArt. Any editor with a blur tool will work. For example, in Pixlr Express you begin by uploading your photo from your device.
Select the Blur Tool or Filter
Next, find the “Blur” tool or effect. In most editors this is under a Retouch or Filters menu. In Photoshop, the Blur tool (usually a water-drop icon) is in the toolbar. In Pixlr, select Blur from the left-side menu. On mobile, you might see options like Lens Blur, Background Blur, or Portrait mode.
Adjust Blur Settings
Then customize the blur brush or filter. Brush Size determines how large an area each stroke covers, and Blur Strength/Intensity controls how strong the effect is. For example, Pixlr lets you slide a control to increase the blur strength or soften its edges. In Photoshop, you choose a brush tip and set its strength percentage. Larger brushes blur broad areas quickly, while smaller brushes let you refine tiny details.
Apply the Blur
Now, paint or apply the blur to your photo. Carefully click and drag the tool over the parts of the image you want to blur—such as faces, backgrounds, or text. In Pixlr, you drag the slider-cursor over the selected area to smear it. In Photoshop, click and move the cursor to paint the blur. Tip: Apply blur in multiple passes for heavier effect. For instance, to obscure a logo on a shirt, zoom in and brush over it several times to fully hide it.
Review and Save
Finally, inspect the result. If the blur is too light, apply another pass or increase intensity. If it’s too heavy, undo or lower the brush strength and try again. Working on a separate layer lets you easily tweak or remove the blur. When satisfied, flatten layers if necessary and export the image in your chosen format (JPG, PNG, etc.).
For example, Snagit’s online Blur Image Tool illustrates this process well. You drag an image into the tool, click the blur brush, then simply click on any area (text or face) to obscure it with a single action. This workflow mirrors what you do in complex editors: open → select blur → apply → save. By following these steps, you can blur any image precisely where you need to.
What Are the Different Blur Effects (Gaussian, Motion, Radial, etc.)?
There are several types of blur effects, each creating a distinct look:
- Gaussian Blur: This is a general softening blur that averages pixel values in a radius around each pixel. It produces a smooth, out-of-focus result. Photographers use Gaussian blur to subtly soften backgrounds or edges without any streaks. It’s the classic “soft focus” effect.
- Motion Blur: Motion blur creates streaks along a specified direction to simulate movement. For instance, a horizontal motion blur on a moving car makes it appear as if it’s zipping past the frame. Directional motion blur can be used to add dynamic action to static images (e.g., blurring the background behind a person to suggest speed).
- Radial (Iris) Blur: Radial blur (also called Iris or Zoom blur) blurs pixels around a central point. Photoshop’s Iris Blur is a good example. You select a focal point to keep sharp, and everything else is blurred in a radial gradient. This is often used to focus attention on one subject while giving a circular out-of-focus background.
- Lens/Bokeh Blur: Mimicking the shallow depth-of-field from a camera lens, this effect blurs the background with soft highlights (bokeh). It’s similar to Gaussian but often keeps a central region sharper. Many smartphone portrait modes use this to blur backgrounds realistically.
- Pixelation: Pixelation replaces image areas with large, solid-colored squares. It produces a blocky censorship effect. Unlike smooth blurs, pixelation makes shapes unrecognizable, which can be more secure for hiding faces or text. It’s included here because many blur tools offer pixelation as a “heavy blur” option.
Comparison of Blur & Censoring Effects
The table below compares common blur and censoring effects, showing their characteristic look and typical use. Gaussian blur softens evenly, motion blur streaks in one direction, radial blur circles around a point, and pixelation blocks out details entirely.
| Effect | Description | Common Use Case |
|---|---|---|
| Gaussian Blur | Smoothly averages neighboring pixels | Softening portrait backgrounds |
| Motion Blur | Applies streaky blur in a set direction | Conveying speed in action shots |
| Radial (Iris) | Blurs in a circle around a focal point | Focusing attention on a subject |
| Lens / Bokeh | Mimics depth-of-field blur with soft highlights | Artistic backgrounds in portraits |
| Pixelation | Replaces details with large color blocks | Censoring faces or text completely |
How Can You Blur Specific Areas (Faces, Text, Backgrounds)?
You can target any part of an image to blur by using selections, masks, or brushes. Selection tools (like lasso or marquee) let you outline a region and then apply blur only inside it. For example, draw around a car’s license plate and apply Gaussian blur to just that area. Brush or mask tools let you paint the blur directly. In Photoshop or Pixlr, you might simply paint over a face to hide it.
For instance, many tools can auto-detect faces. If you load a photo of people, some editors have “portrait mode” or face-aware filters that automatically blur the background. Alternatively, Snagit’s online blur tool lets you click on any part of the image to blur or pixelate it. A single click can obscure a person’s face or an email address. This is especially handy for screenshots: just click on the text or image to hide it instantly.
When blurring text, ensure sufficient blur intensity. A slight Gaussian blur might not fully mask letters. If you need stronger concealment, use pixelation or redaction shapes. For example, news outlets often pixelate faces or license plates to guarantee anonymity. Using a solid block or heavy pixelation is the most secure way to hide sensitive details when plain blur isn’t enough.
For backgrounds, just apply blur broadly. In most portrait apps, you can tap to blur the entire background layer. In a desktop editor, create a mask around the foreground subject and invert it, then apply blur to everything outside the mask. This isolates the subject with a softened backdrop.
By combining these methods, you have full control over exactly what to blur—whether it’s people, text, or the whole scene. (For detailed techniques, see our guide on Blur Image: The Ultimate Guide to Blurring Photos).
Blur vs. Pixelation: Which Should You Use When?
Choosing between blur and pixelation depends on your goal. Pixelation replaces the region with large colored blocks, giving a classic “censored” look. It is often stronger for privacy: as privacy security research notes, pixelation usually outperforms a gentle blur at hiding identities. If you’re hiding faces or license plates, pixelation ensures shapes cannot be guessed or reconstructed through deblurring algorithms. Likewise, solid black blocks or shapes are even more secure for legal compliance (though they stand out visually).
Conversely, a soft blur looks more natural and seamless. Use Gaussian or lens blur when you want an artistic effect or to subtly de-emphasize details. For example, blur the edges of a background in a portrait to add depth, but you wouldn’t pixelate flowers in that case. Soft blur preserves the aesthetic flow of the image.
That being said, be careful not to under-blur. Always check at full resolution: if text is still readable or a face recognizable, increase the intensity. For strict anonymization (e.g., GDPR or HIPAA compliance), lean on pixelation or solid redaction. In summary: blur for style, pixelate for maximum privacy.
What Mistakes Should You Avoid When Using the Blur Tool?
Make sure you only blur non-essential parts. If you accidentally blur part of the subject you wanted to keep visible, it can ruin the photo. Double-check that the main subject is crisp and unblurred.
Don’t apply a tiny, almost imperceptible blur to personal information—if privacy is a concern, even a slight blur may be reversible. If you’re hiding confidential details, err on stronger blur or pixelation. Always zoom in on the final image to ensure blurred content is truly illegible.
Always make a copy or a new layer before applying blur. That way, if you change your mind or need to refine the effect, you aren’t stuck with a permanently altered photo. Non-destructive editing (using layers and masks) is the best practice.
If you blur a small image and then enlarge it, the blur may appear weaker. Always export at the intended resolution and review at 100% size. Additionally, if you’ve combined blur with overlays or graphics, flatten the image before saving to “lock in” the blur.
In short, double-check your edits. The worst mistake is thinking you’ve hidden something when it’s still visible. By confirming blurred areas are fully obscured and by working non-destructively, you’ll ensure your final image is both effective and professional.
Which Software and Apps Offer Effective Blur Tools?
Many editors across platforms include blur functions:
Desktop Editors
Adobe Photoshop and GIMP offer the most control. Photoshop features a full Blur Gallery (Gaussian, Motion, Radial, etc.) and brush tools. GIMP’s Blur/Sharpen tool provides Gaussian and pixelate filters completely free of charge.
Online & Browser Tools
Pixlr (web-based) has a straightforward Blur brush. Canva offers a Frame Blur/Pixellate feature for designers. Browser extensions like AI BlurWeb can even blur live web content or screenshots automatically.
Mobile Apps
Smartphone editors like Snapseed, PicsArt, and Photoshop Express have built-in blur filters. For example, Snapseed’s Lens Blur lets you tap to set a focus area and blurs the rest with touch gestures.
Specialty Privacy Tools
Snagit’s online blur image tool lets you drag and drop a screenshot and blur or pixelate any area with one click. Dedicated AI tools like AI BlurWeb detect faces and credentials automatically.
Free vs. Paid: Many blur tools are free. GIMP, Pixlr, and smartphone apps are free or freemium, while Photoshop and professional plugins require a subscription. Mentioning free alternatives builds trust: you can practice blurring without buying expensive software.
Next Steps
Now that you understand blur basics, keep practicing and expanding your skills:
- Try advanced features: In Photoshop, experiment with the Blur Gallery’s Iris, Field, and Tilt-Shift blurs. Mobile phones often have a “portrait mode” which automatically blurs backgrounds—try those and adjust depth controls.
- Combine effects: After blurring, use sharpening on the subject or add creative filters. For instance, blur a background and then add a light leak or color filter for a dreamy look. Tip: after blurring, add text overlays or graphics on top to create memes or announcements.
- Learn related tools: Explore the Smudge tool and Sharpen filters. Sharpening the main subject after blurring its surroundings can make it pop. (Check out our Photo Blur Guides for step-by-step help).
- Use AI blur tools: Modern tools like AI BlurWeb can auto-detect sensitive text, credit cards, or passwords. Try one of these to speed up your workflow, especially for sharing visuals or complying with privacy laws.
- Experiment with filters: Blur pairs well with bokeh and glow effects. Practice blending blur with lighting and color adjustments to find your signature aesthetic.
- Practice on projects: Apply blur in different contexts. Try creating a social media post by blurring a photo background and adding a catchy caption, or practice on nature photos by blurring the sky to focus on landscapes.
Conclusion
Mastering the blur tool empowers you to both create stunning images and protect sensitive information. In this guide, you learned that blur tools soften parts of an image to hide details or create focus. You saw why blurring backgrounds isolates subjects and keeps data private, and you learned the step-by-step process to apply blur in various editors.
With this knowledge, you can confidently use blur where it’s needed — whether that’s to emphasize a subject with a dreamy background or to redact personal details in a screenshot. By practicing with different blur effects and tools, you’ll quickly see how a well-placed blur can transform your ordinary photo into a professional-looking image while keeping unwanted information safely hidden.

Written & Reviewed by Deepak (Founder)
Founder & Solo Developer at AIBlurWeb
Deepak builds privacy-focused browser tools and writes about screen privacy, browser security, sensitive-data protection, screen sharing, and AI-powered privacy tools. Read more about the founder →
Disclaimer: This article was initially drafted using AI assistance. However, the content has undergone thorough revisions, editing, and fact-checking by human editors and subject matter experts to ensure accuracy.